
개발자 되어버리기
SpringBoot에 Swagger API DOCS 적용하기 본문
백엔드쪽에서 RSET API 개발하고 나면 프론트엔드와 협업을 위해 Parameter, Header, Body 등에 대한 설명을 편하게 웹문서화 시켜주는 라이브러리입니다.
SpringBoot 2.2.7 버전이며 Gradle 기준 입니다.
// api 문서화 라이브러리 swagger 추가
    compile 'io.springfox:springfox-swagger2:2.9.2'
    compile 'io.springfox:springfox-swagger-ui:2.9.2'
┖ 우선 swagger 라이브러리에 대한 의존성을 gradle에 추가해줍니다.
import com.google.common.collect.Lists;
import org.springframework.context.annotation.Bean;
import org.springframework.context.annotation.Configuration;
import springfox.documentation.builders.PathSelectors;
import springfox.documentation.builders.RequestHandlerSelectors;
import springfox.documentation.service.*;
import springfox.documentation.spi.DocumentationType;
import springfox.documentation.spi.service.contexts.SecurityContext;
import springfox.documentation.spring.web.plugins.Docket;
import springfox.documentation.swagger2.annotations.EnableSwagger2;

import java.util.ArrayList;
import java.util.List;

@Configuration
@EnableSwagger2
public class SwaggerConfig {
    private String version;
    private String title;

    @Bean
    public Docket apiV1() {
        version = "V1";
        title = "REST API ";
        return new Docket(DocumentationType.SWAGGER_2)
                .useDefaultResponseMessages(false)
                .groupName(version)
                .select()
                .apis(RequestHandlerSelectors.basePackage("com.spring.controller"))
                .paths(PathSelectors.ant("/api/**"))
                .build()
                .apiInfo(apiInfo(title, version))
                .securityContexts(Lists.newArrayList(securityContext())) // 61번째 주석 참고
                .securitySchemes(Lists.newArrayList(apiKey())); // 61번째 주석 참고
    }
    @Bean
    public Docket apiV2() {
        version = "V2";
        title = "REST API ";
        return new Docket(DocumentationType.SWAGGER_2)
                .useDefaultResponseMessages(false)
                .groupName(version)
                .select()
                .apis(RequestHandlerSelectors.basePackage("com.spring.controller"))
                .paths(PathSelectors.ant("/api/**"))
                .build()
                .apiInfo(apiInfo(title, version));

    }
    private ApiInfo apiInfo(String title, String version) {
        return new ApiInfo(
                title,
                "통합 API Docs",
                version,
                "www.example.com",
                new Contact("개발자에게 문의하기", "https://github.com/Koobonik", ""),
                "Licenses",
                "www.example.com",
                new ArrayList<>());
    }
	// 이 밑에 부분들은 api 토큰이나 jwt같은 것들을 api에서 미리 인증할 수 있도록 도와줍니다.
    private ApiKey apiKey() {
        return new ApiKey("JWT","JWT" , "header");
    }
    private SecurityContext securityContext() {
        return SecurityContext.builder().securityReferences(defaultAuth()).forPaths(PathSelectors.any()).build();
    }

    List<SecurityReference> defaultAuth() {
        AuthorizationScope authorizationScope = new AuthorizationScope("global", "accessEverything");
        AuthorizationScope[] authorizationScopes = new AuthorizationScope[1];
        authorizationScopes[0] = authorizationScope;
        return Lists.newArrayList(new SecurityReference("JWT", authorizationScopes));
    }
}
┖ configuration으로 @EnableSwagger2와 @Configuration 어노테이션으로 의존성을 주입합니다.
@RestController
@RequestMapping("api/v1")
public class Api_V1 {

    @ApiOperation(value = "HTTP GET EXAMPLE", notes = "GET 요청에 대한 예제 입니다.")
    @ApiResponses({
            @ApiResponse(code = 200, message = "성공"),
            @ApiResponse(code = 500, message = "서버에러"),
            @ApiResponse(code = 404, message = "찾을 수 없음")
    })
    @RequestMapping(value = "/", method = {RequestMethod.GET, RequestMethod.POST})
    public @ResponseBody String main(@ApiParam(value = "테스트 파라미터_1", required = true, example = "test_parameter_1") @RequestParam String test1,
                                     @ApiParam(value = "테스트 파라미터_2", required = true, example = "test_parameter_2") @RequestParam String test2) {
        return test1 + " : " + test2;
    }

    @ApiOperation(value = "로그인", notes = "로그인에 대한 요청을 보냅니다.")
    @RequestMapping(value = "login", method = {RequestMethod.GET, RequestMethod.POST})
    public String login(@RequestBody LoginRequestDto loginRequestDto){

        return loginRequestDto.getUserName() + " : " + loginRequestDto.getUserPassword();
    }
}
┖ 이후 RestController를 작성하면 됩니다.
이후 http://127.0.0.1:8080/swagger-ui.html
접속을 하게되면 Swagger 관련 API 문서화된 웹페이지를 보실 수 있으실 겁니다.
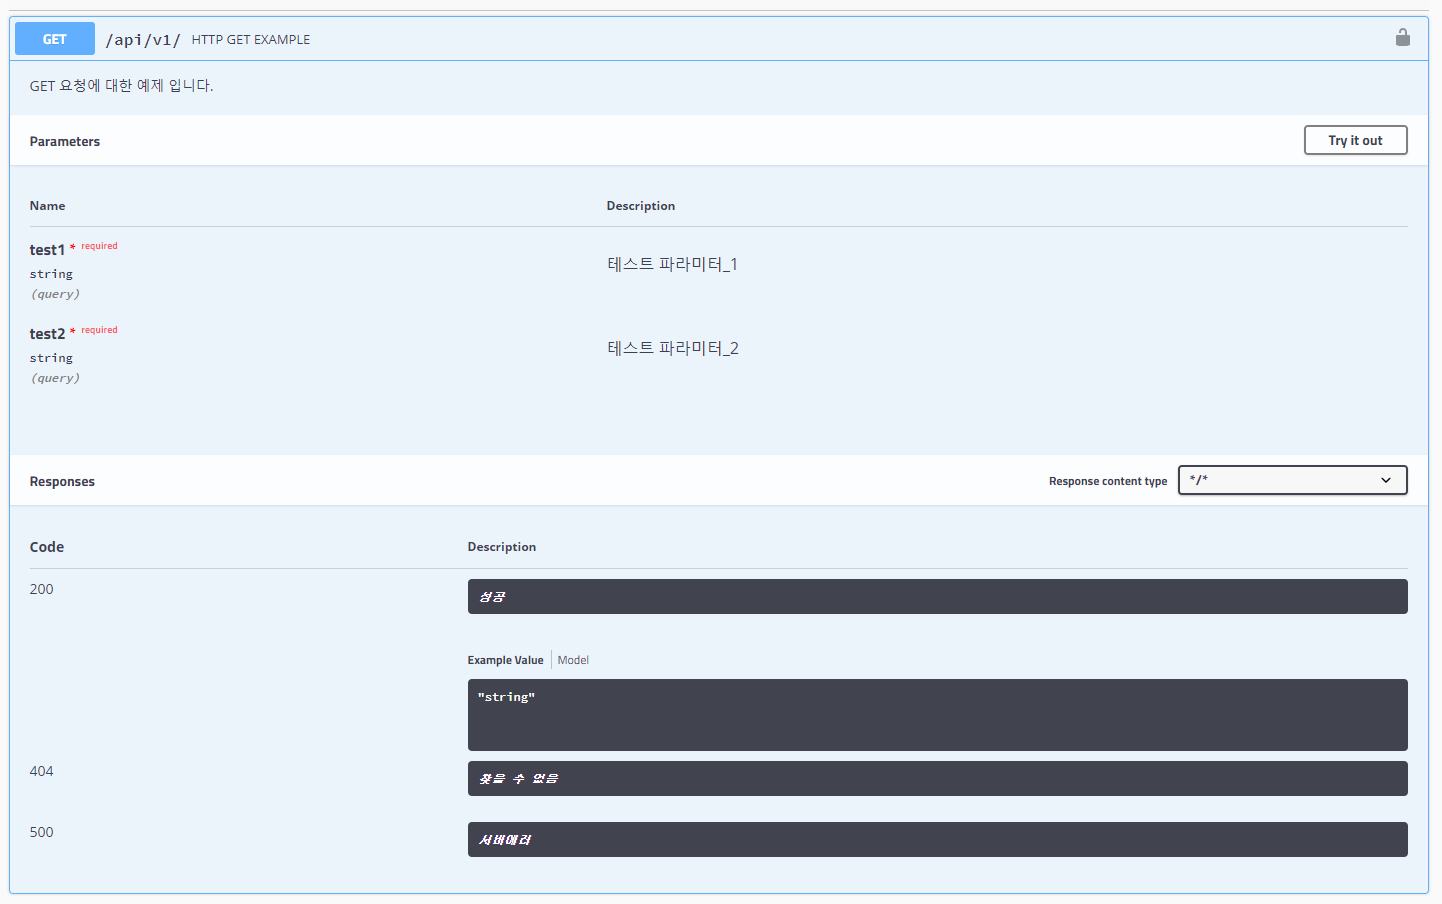
"/" 주소로 보낼때는 아래와 같은 설명이 뜨게 됩니다.
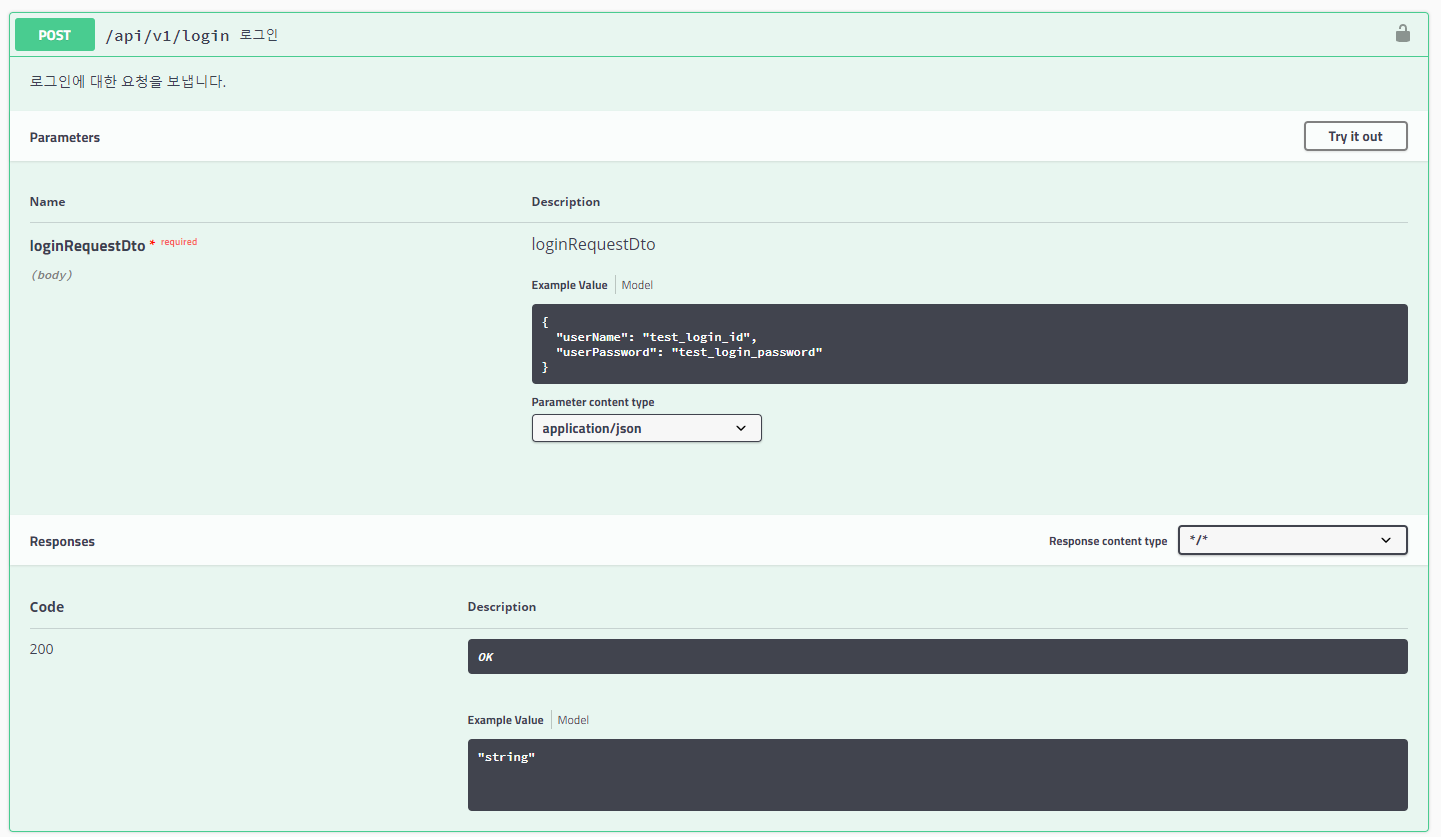
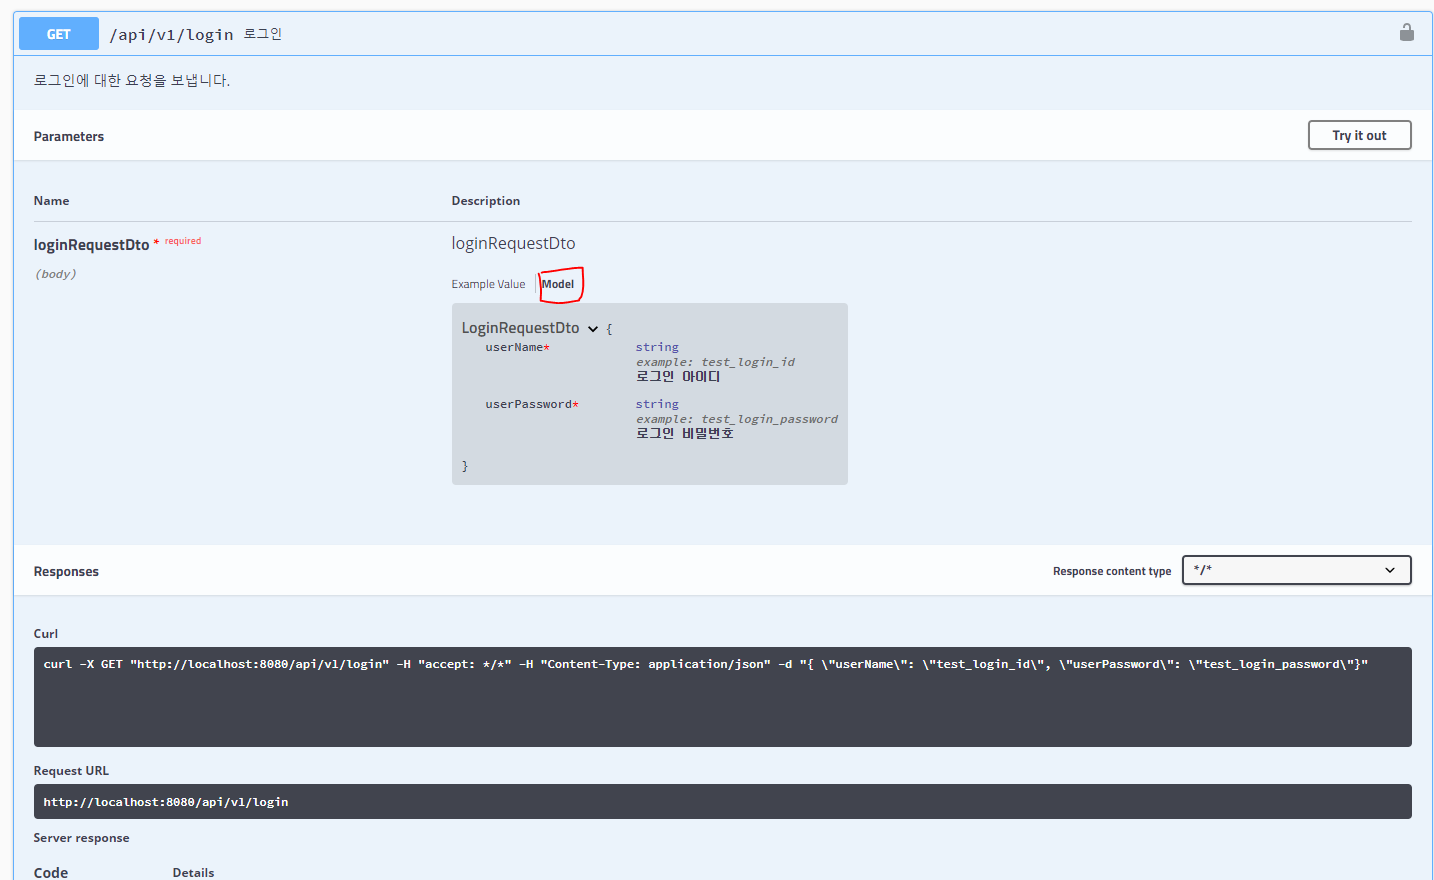
POST 같은 경우에는 자세히 보시면 따로 loginRequestDto를 따로 선언해주었습니다.
그에 따라 Model도 따로 더 생성이 됩니다.
@Data
@Service
@Getter
@AllArgsConstructor
@NoArgsConstructor
public class LoginRequestDto {
    // Model 에 보이는 설명들.
    @ApiModelProperty(example = "test_login_id", value = "로그인 아이디", required = true)
    private String userName;

    @ApiModelProperty(example = "test_login_password", value = "로그인 비밀번호", required = true)
    private String userPassword;
}
┖ 위처럼 @ApiModelProperty를 주입해주면 Model클릭시 나오는 설명들과 매핑시킬 수 있습니다.
'개발 > Spring_Boot' 카테고리의 다른 글
| 로컬환경에 SpringBoot에서 간단하게 https 적용하기 (0) | 2020.10.25 |
|---|---|
| Springboot Security + JWT (Json Web Token - RS256 ) 발급하기 (0) | 2020.10.19 |
| yml에서 데이터 가져오기 및 스프링부트 디비 2개 이상 연결하는 법 (0) | 2020.10.11 |
| 리눅스 터미널에서 Springboot 빌드하고 실행하기 (4) | 2018.07.19 |
| Springboot 에서 HelloWorld 띄우기 (0) | 2018.06.21 |
'개발/Spring_Boot' Related Articles
more


