
개발자 되어버리기
Springboot Security + JWT (Json Web Token - RS256 ) 발급하기 본문
과거에는 거의 모든것이 세션기반이었기에 서버에 부담이 많이 갔었고 때문에 서버가 자주 장애를 일으키곤 했습니다.
하지만 요즘 추세는 세션기반보다는 JWT로 서버에 부담이 덜 가는 방식을 많이 사용하고 있습니다.
RSA 키교환 방식으로 알고리즘을 RS256 으로 적용해보겠습니다.
-- RS, HS 관련 혼동되는 것이 있어 추후에 수정하도록 하겠습니다.
dependencies {
    implementation 'org.springframework.boot:spring-boot-starter-data-jdbc'
    implementation 'org.springframework.boot:spring-boot-starter-data-jpa'
    implementation 'org.springframework.boot:spring-boot-starter-mail'
    implementation 'org.springframework.boot:spring-boot-starter-validation'
    implementation 'org.springframework.boot:spring-boot-starter-web'
    compileOnly 'org.projectlombok:lombok'
    runtimeOnly 'com.h2database:h2'
    runtimeOnly 'mysql:mysql-connector-java'
    annotationProcessor 'org.projectlombok:lombok'
    testImplementation('org.springframework.boot:spring-boot-starter-test') {
        exclude group: 'org.junit.vintage', module: 'junit-vintage-engine'
    }
    annotationProcessor "org.springframework.boot:spring-boot-configuration-processor"
    compile("org.json:json:20141113")

    // api 문서화 라이브러리 swagger 추가
    compile 'io.springfox:springfox-swagger2:2.9.2'
    compile 'io.springfox:springfox-swagger-ui:2.9.2'

    // jwt 토큰 기반 의존성 추가
    implementation 'io.jsonwebtoken:jjwt:0.9.1'

    // Spring security 추가
    implementation 'org.springframework.boot:spring-boot-starter-security'
    testImplementation 'org.springframework.security:spring-security-test'
}
우선 스프링 시큐리티를 추가 합니다.
이전 포스팅에도 있듯 Swagger 라이브러리도 함께 적용되어 있습니다.
제일먼저 할 일은 JWT 제공 클래스와 스프링시큐리티에 적용될 필터를 만드는 것입니다.
import com.spring.util.PemReader;
import io.jsonwebtoken.Claims;
import io.jsonwebtoken.Jws;
import io.jsonwebtoken.Jwts;
import io.jsonwebtoken.SignatureAlgorithm;
import lombok.RequiredArgsConstructor;
import org.springframework.security.authentication.UsernamePasswordAuthenticationToken;
import org.springframework.security.core.Authentication;
import org.springframework.security.core.userdetails.UserDetails;
import org.springframework.security.core.userdetails.UserDetailsService;
import org.springframework.stereotype.Component;
import javax.annotation.PostConstruct;
import javax.servlet.http.HttpServletRequest;
import java.io.IOException;
import java.nio.file.Files;
import java.nio.file.Path;
import java.nio.file.Paths;
import java.security.GeneralSecurityException;
import java.security.PrivateKey;
import java.util.*;

@RequiredArgsConstructor
@Component
public class JwtTokenProvider {

    private PrivateKey secretKey;

    // 토큰 유효시간 1달
    private final long tokenValidTime = 60 * 30  * 1000L;

    private final UserDetailsService userDetailsService;

    // 객체 초기화, secretKey를 Base64로 인코딩한다.
    @PostConstruct
    protected void init() throws IOException, GeneralSecurityException {
        // 30분 단위로 갱신되는 토큰 값.
        Path path = Paths.get("src/main/resources/token_key.pem");
        List<String> reads = Files.readAllLines(path);
        String read = "";
        for (String str : reads){
            read += str+"\n";
        }
        secretKey = PemReader.getPrivateKeyFromString(read);
    }

    // JWT 토큰 생성
    public String createToken(String userPk, List<String> roles, PrivateKey key) {
        Claims claims = Jwts.claims().setSubject(userPk); // JWT payload 에 저장되는 정보단위
        claims.put("roles", roles); // 정보는 key / value 쌍으로 저장된다.
        Map<String, Object> header = new HashMap<>();
        header.put("alg", "RS256");
        header.put("typ", "JWT");
        Date now = new Date();
        return Jwts.builder()
                .setHeader(header) // 알고리즘과 토큰 타입을 헤더에 넣어줌
                .setClaims(claims) // 유저의 이름(userPk)등이 담겨있음
                .setIssuedAt(now) // 토큰 발행 시간 정보 iat
                .setExpiration(new Date(now.getTime() + tokenValidTime)) // set Expire Time 언제까지 유효한지.
                .signWith(SignatureAlgorithm.RS256, key)  // 사용할 암호화 알고리즘과
                .setIssuer("dev_koo")
                .setId("s아이디아이디")


                // signature 에 들어갈 secret값 세팅
                .compact();
    }

    // JWT 토큰에서 인증 정보 조회
    public Authentication getAuthentication(String token) {
        UserDetails userDetails = userDetailsService.loadUserByUsername(this.getUserPk(token));
        return new UsernamePasswordAuthenticationToken(userDetails, "", userDetails.getAuthorities());
    }

    // 토큰에서 회원 정보 추출
    public String getUserPk(String token) {
        return Jwts.parser().setSigningKey(secretKey).parseClaimsJws(token).getBody().getSubject();
    }

    // 임시로 세션에 있는 개인키까지 던져준다.
    public String getUserPk(String token, PrivateKey privateKey) {
        return Jwts.parser().setSigningKey(privateKey).parseClaimsJws(token).getBody().getSubject();
    }

    // Request의 Header에서 token 값을 가져옵니다. "JWT" : "TOKEN값'
    public String resolveToken(HttpServletRequest request) {
        return request.getHeader("JWT");
    }

    // 토큰의 유효성 + 만료일자 확인
    public boolean validateToken(String jwtToken) {
        try {
            Jws<Claims> claims = Jwts.parser().setSigningKey(secretKey).parseClaimsJws(jwtToken);
            return !claims.getBody().getExpiration().before(new Date());
        } catch (Exception e) {
            return false;
        }
    }

    // 토큰의 유효성 + 만료일자 확인
    public boolean validateToken(String jwtToken, PrivateKey privateKey) {
        try {
            Jws<Claims> claims = Jwts.parser().setSigningKey(privateKey).parseClaimsJws(jwtToken);
            return !claims.getBody().getExpiration().before(new Date());
        } catch (Exception e) {
            return false;
        }
    }

}
┖ 보시면 token_key.pem 파일을 사용합니다.
이는 RS256 방식으로 암호화를 하기 때문인데
pem 키를 추출하는 방법은 정말 쉽습니다.
openssl genrsa -out private_key.pem 2048┖ 우선 BEGIN RSA PRIVATE KEY 로 시작하는 키를 생성합니다.
openssl pkcs8 -topk8 -inform PEM -in private_key.pem -out token_key.pem -nocrypt┖ 그리고 위에 명령어로 pkcs#1 형식의 pem을 kcs#8 형식으로 변환 시켜주면 됩니다.
import lombok.RequiredArgsConstructor;
import org.springframework.security.core.Authentication;
import org.springframework.security.core.context.SecurityContextHolder;
import org.springframework.web.filter.GenericFilterBean;

import javax.servlet.FilterChain;
import javax.servlet.ServletException;
import javax.servlet.ServletRequest;
import javax.servlet.ServletResponse;
import javax.servlet.http.HttpServletRequest;
import java.io.IOException;

@RequiredArgsConstructor
public class JwtAuthenticationFilter extends GenericFilterBean {

    private final JwtTokenProvider jwtTokenProvider;

    @Override
    public void doFilter(ServletRequest request, ServletResponse response, FilterChain chain) throws IOException, ServletException {
        // 헤더에서 JWT 를 받아옵니다.
        String token = jwtTokenProvider.resolveToken((HttpServletRequest) request);
        // 유효한 토큰인지 확인합니다.
        if (token != null && jwtTokenProvider.validateToken(token)) {
            // 토큰이 유효하면 토큰으로부터 유저 정보를 받아옵니다.
            Authentication authentication = jwtTokenProvider.getAuthentication(token);
            // SecurityContext 에 Authentication 객체를 저장합니다.
            SecurityContextHolder.getContext().setAuthentication(authentication);
        }
        chain.doFilter(request, response);
    }
}
우선 스프링시큐리티를 스프링부트에 추가하여 빌드하게되면 빌드할 때마다 계속 암호를 입력해줘야 합니다..
그렇기에 적당하게 권한을 설정해줍니다.
import com.spring.util.jwt.JwtAuthenticationFilter;
import com.spring.util.jwt.JwtTokenProvider;
import lombok.RequiredArgsConstructor;
import org.springframework.context.annotation.Bean;
import org.springframework.security.authentication.AuthenticationManager;
import org.springframework.security.config.annotation.web.builders.HttpSecurity;
import org.springframework.security.config.annotation.web.configuration.EnableWebSecurity;
import org.springframework.security.config.annotation.web.configuration.WebSecurityConfigurerAdapter;
import org.springframework.security.config.http.SessionCreationPolicy;
import org.springframework.security.web.authentication.UsernamePasswordAuthenticationFilter;

@RequiredArgsConstructor
@EnableWebSecurity
public class WebSecurityConfig extends WebSecurityConfigurerAdapter {

    private final JwtTokenProvider jwtTokenProvider;

    // authenticationManager를 Bean 등록합니다.
    @Bean
    @Override
    public AuthenticationManager authenticationManagerBean() throws Exception {
        return super.authenticationManagerBean();
    }

    @Override
    protected void configure(HttpSecurity http) throws Exception {
        http
                .httpBasic().disable() // rest api 만을 고려하여 기본 설정은 해제하겠습니다.
                .csrf().disable() // csrf 보안 토큰 disable처리.
                .sessionManagement().sessionCreationPolicy(SessionCreationPolicy.STATELESS) // 토큰 기반 인증이므로 세션 역시 사용하지 않습니다.
                .and()
                .authorizeRequests() // 요청에 대한 사용권한 체크
                .antMatchers("/admin/**").hasRole("ADMIN")
                .antMatchers("/user/**").hasRole("USER")
                .anyRequest().permitAll() // 그외 나머지 요청은 누구나 접근 가능
                .and()
                .addFilterBefore(new JwtAuthenticationFilter(jwtTokenProvider),
                        UsernamePasswordAuthenticationFilter.class);
    }
}
또한 계정을 인증할 클래스가 필요하겠죠?
@Getter
@Setter
@Entity
@NoArgsConstructor
@AllArgsConstructor
@Builder
public class ExampleUser implements UserDetails {
    @Id
    @GeneratedValue(strategy = GenerationType.AUTO)
    private long exampleUserId;

    private String userLoginId;
    private String userPassword;

    @ElementCollection(fetch = FetchType.EAGER)
    @Builder.Default
    private List<String> roles = new ArrayList<>();


    @Override
    public Collection<? extends GrantedAuthority> getAuthorities() {
        return this.roles.stream()
                .map(SimpleGrantedAuthority::new)
                .collect(Collectors.toList());
    }

    @Override
    public String getPassword() {
        return null;
    }

    @Override
    public String getUsername() {
        return null;
    }

    @Override
    public boolean isAccountNonExpired() {
        return false;
    }

    @Override
    public boolean isAccountNonLocked() {
        return false;
    }

    @Override
    public boolean isCredentialsNonExpired() {
        return false;
    }

    @Override
    public boolean isEnabled() {
        return false;
    }
}
@RequiredArgsConstructor
@Service
public class CustomUserDetailService implements UserDetailsService {
private final ExampleUserRepository exampleUserRepository;
@Override
public UserDetails loadUserByUsername(String id) throws UsernameNotFoundException {
return exampleUserRepository.findByUserLoginId(id);
}
}
이제부터는 RS256 적용을 위한 개인키와 공개키를 만들고 뿌려주는 과정을 거칩니다.
추후비대칭키 암호화를 위해서 클라이언트 입장에서는 공개키를 받아야합니다.
// 공개키 발급
    @ApiOperation(value = "공개키 api", notes = "로그인이나 회원가입시 쓰이는 공개키 가져오는 api")
    @GetMapping("/getPublicKey")
    public PublicKeyResponseDto getPublicKey(HttpServletRequest request) throws NoSuchAlgorithmException, InvalidKeySpecException {
        HttpSession httpSession = request.getSession();
        KeyPairGenerator generator = KeyPairGenerator.getInstance("RSA");
        generator.initialize(2048);
        KeyPair keyPair = generator.genKeyPair();
        KeyFactory keyFactory = KeyFactory.getInstance("RSA");
        PublicKey publicKey = keyPair.getPublic();
        PrivateKey privateKey = keyPair.getPrivate();
        // httpSession(세션) : 서버단에서 관리! -> 개인키가 안전하게 보관됨 -> 이후에 자동적으로 만료되며 소멸되기에 관리에 용이함
        // 회원가입에 성공하거나 로그인 했을경우에는 세션에서 개인키를 지워 주면 Best
        httpSession.setAttribute("privateKey", privateKey);
        log.info("개인키");
        log.info(httpSession.getAttribute("privateKey"));
        // 추출
        RSAPublicKeySpec publicSpec = keyFactory.getKeySpec(publicKey, RSAPublicKeySpec.class);
        String publicKeyModulus = publicSpec.getModulus().toString(16);
        String publicKeyExponent = publicSpec.getPublicExponent().toString(16);
        PublicKeyResponseDto publicKeyResponseDto = PublicKeyResponseDto.builder()
                .publicKey(publicKey.toString())
                .RSAExponent(publicKeyModulus)
                .RSAModulus(publicKeyExponent)
                .build();
        log.info(publicKeyResponseDto);
        return publicKeyResponseDto;
    }
이후에는 회원가입과 로그인 기능도 구현해야하지만 여기에서는 로그인 로직만 임의로 구현하겠습니다.
private final JwtTokenProvider jwtTokenProvider;
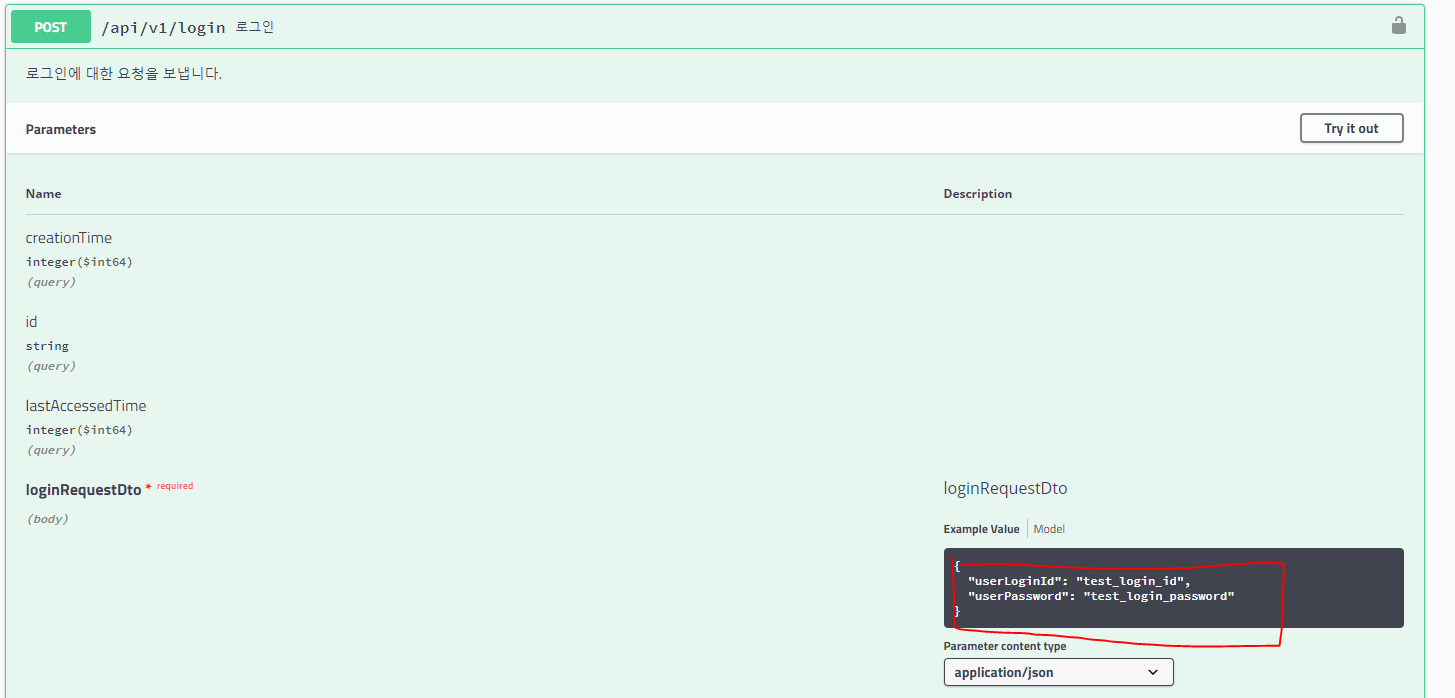
@ApiOperation(value = "로그인", notes = "로그인에 대한 요청을 보냅니다.")
@PostMapping(value = "login")
public String login(@RequestBody LoginRequestDto loginRequestDto, HttpSession httpSession){
// 일단 이렇게 계정이 있고 알맞게 로그인했다고 가정합시다!
ExampleUser exampleUser = new ExampleUser();
exampleUser.setExampleUserId(1);
exampleUser.setUserLoginId(loginRequestDto.getUserLoginId());
exampleUser.setUserPassword(loginRequestDto.getUserPassword());
exampleUser.setRoles(Collections.singletonList("ROLE_USER"));
if(loginRequestDto.getUserLoginId().equals("test_login_id") && loginRequestDto.getUserPassword().equals("test_login_password")){
log.info((PrivateKey) httpSession.getAttribute("privateKey"));
return jwtTokenProvider.createToken(exampleUser.getUserLoginId(), exampleUser.getRoles());
}
return loginRequestDto.getUserLoginId() + " : " + loginRequestDto.getUserPassword();
}위의 코드를 설명드리자면 로그인시 계정정보가 일치한다면 jwtTokenProvider가 권한설정과 함께 토큰을 발행하여 리턴해줍니다.
이제 테스트를 진행해보겠습니다.
우선 키를 발급받으면 클라이언트는 공개키를, 서버는 그에 맞는 개인키를 갖게 됩니다.

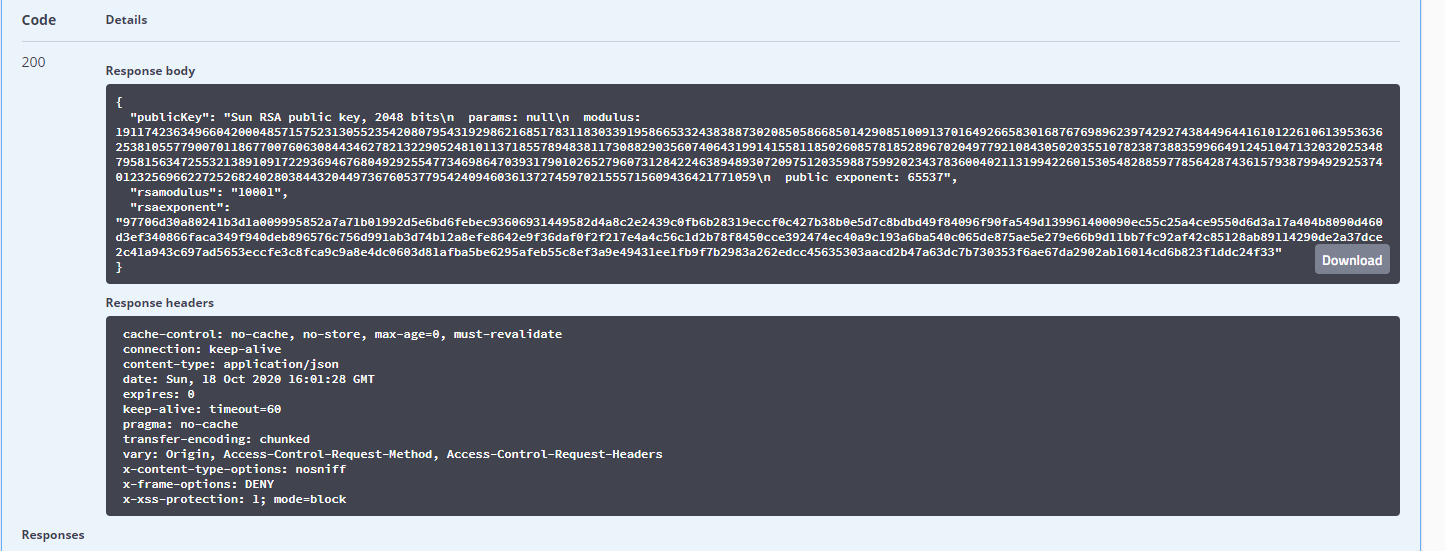
위와같이 공개키를 발급받게됩니다. (사실 현 포스팅에서는 크게 중요하지 않습니다.)

이제 저 토큰값을 복사해서
JWT.IO
JSON Web Tokens are an open, industry standard RFC 7519 method for representing claims securely between two parties.
jwt.io
쪽에 들어가서 스크롤을 좀 밑으로 내리면 확인할 수 있습니다.

'개발 > Spring_Boot' 카테고리의 다른 글
| Springboot + NAVER S.E.N.S 보내기 (V2 헤더 세팅) (8) | 2020.11.14 |
|---|---|
| 로컬환경에 SpringBoot에서 간단하게 https 적용하기 (0) | 2020.10.25 |
| SpringBoot에 Swagger API DOCS 적용하기 (0) | 2020.10.18 |
| yml에서 데이터 가져오기 및 스프링부트 디비 2개 이상 연결하는 법 (0) | 2020.10.11 |
| 리눅스 터미널에서 Springboot 빌드하고 실행하기 (4) | 2018.07.19 |


